In order to see item icons in the item shop or other section of the website, you need first to upload them.
Item list txt
First of all you will need the item_list.txt file from client client. It is usually located in the root or locale pack.
After you have located this file, you can upload it in the dashboard of your website.
From the side panel go to Settings > Import item icons.
Here you can upload the item_list.txt file. After the upload is completed, do not forget to click on the save button!
Converting and uploading icons
Icons need to be converted to PNG format first. To bulk convert all your icons, you can use any software you want, for example XnConvert.
During the conversion, the file name must be preserved! For example, if the name of the icon was 00010.tga it must be converted into 00010.png.
After you have converted all the icons, upload them to this folder:
/home/<user>/web/<your website>/public_html/storage/app/public/item_iconsHelp! I can’t see some icons!
If you can’t see some icons, be sure that an entry for that item exist in the table of the website item_icons.
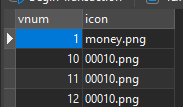
Look for the vnum of the item of which you can’t see the icon and add it in case is missing. Also check that the file name under the column icon is correct and that the file actually exist in the item_icons folder.